I used Netbeans version 6.9.1 for this tutorial. Just follow the instructions below and you have your project working.
STEP 1.
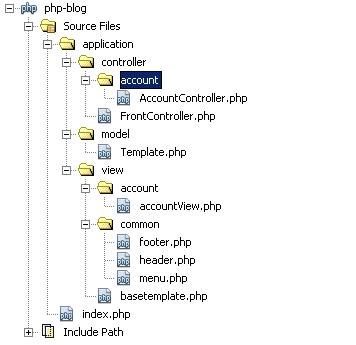
Create a project named php-blog (in fact, name it whatever you want). For now, strictly follow the folder hierarchy for us to better digest the idea. Here is how it looks like.
The idea is to group related codes according to what they do in the application.
STEP 2.
Create your FrontController and place it under the controller folder. As you may well know, the code for FrontController looks like this.<?php
class FrontController{
private static $instance;
private function __construct() {}
public static function instance(){
if(!defined("APP_DIR")){
exit("Severe: Cannot proceed without access to application directory.");
}
if(!self::$instance){
self::$instance = new self();
}
return self::$instance;
}
public function redirect(){
$page = !empty($_GET["page"]) ? $_GET["page"] : "home";
$action = !empty($_GET["action"]) ? $_GET["action"] : "default";
$object = ucfirst($page) . "Controller";
$file = APP_DIR . "/controller/" . $page . "/" . $object . ".php";
if(!is_file($file)){
exit("Severe: Controller not found!");
}
require_once $file;
$method = "do" . ucfirst($action);
$controller = new $object();
if(!method_exists($controller, $method)){
exit("Severe: Action not found.");
}
$controller->$method();
exit(0);
}
}
?>
Here is how it looks like.

STEP 3.
Here we go. Create your basetemplate and place it under your view folder. Design it as you may want it to look like. For the purpose of this post, I made it simple and understandable. Here’ what I did.<html>
<head>
<meta http-equiv="Content-Type" content="text/html; charset=UTF-8">
<title></title>
</head>
<body>
<div>
<?php
// header
include 'application/view/common/header.php';
// menu
include 'application/view/common/menu.php';
// body
include $template . '.php';
// footer
include 'application/view/common/footer.php';
?>
</div>
</body>
</html>
</div>
Here is how it looks like.
STEP 4.
Create the common parts of a web page which I believe you are familiar with. They are the header, menu and the footer. Place it under the view folder, inside the common section. A little information about these pages are shown below.header.php
<div style="height: 30px; border: 1px solid green; padding: 5px 0px 0px 5px;">
HEADER SECTION
</div>
menu.php
<div style="height: 30px; border: 1px solid green; padding: 5px 0px 0px 5px;">
MENU SECTION
</div>
footer.php
<div style="height: 30px; border: 1px solid green; padding: 5px 0px 0px 5px;">
FOOTER SECTION
</div>
Here is how it looks like.

STEP 5.
Create a template object and place it under the model folder. This is an abstract class and will be extended everytime you create a controller. The code will be like this.<?php
/*
* To change this template, choose Tools | Templates
* and open the template in the editor.
*/
abstract class Template {
//put your code here
public function invokeTemplate($template){
include_once APP_DIR . '/view/basetemplate.php';
}
}
?>
Here is how it looks like.

STEP 6.
Create your account controller and the corresponding view of the function.6a. Create your account controller and place it under the controller folder, inside the account section. Extend this controller to Template and create one function which will hold the dynamic body of the base template.
<?php
/*
 * To change this template, choose Tools | Templates
 * and open the template in the editor.
 */

/**
 * Description of AccountController
 *
 * @author
 */
include_once APP_DIR . '/model/Template.php';
class AccountController extends Template{

    public function doAccount(){
        $this->message = "Im on account method!";

    }

}
?>
Here is how it looks like.
6b. Create the corresponding view. The filename will be the same as the AccountController’s function doAccount eliminating the prefix do and appended with View. The dynamic body code looks like this.
<?php

    echo $this->message;
?>
Here is how it looks like.

STEP 7.
Update your index.php by including these lines of code to it. The index.php lies at the root so that it is the first page to be landed everytime you want a request.<?php
define('APP_DIR', dirname(__FILE__) . "/application");
require_once 'application/controller/FrontController.php';
FrontController::instance()->redirect();
?>
The whole structure looks like this.
STEP 8.
Type in the address bar this url: http://yourhost:port/php-blog/index.php?page=account&action=account. What do you see? Right! You got you application working fine with a base template. The only thing that changes everytime is the body section because it is where you display your data. Just for formality sake, here is the output.
As you can see, the body prints the message from the account. Change the message and it is the only part that changes. Try including the one below.
Update accountView.php with these parameters:
<?php
 if(isset ($this->name) && $this->name != NULL){
 echo 'Hello, ' . $this->name;
}
?>
<form action="" method="POST">
  <input type="text" name="name" value=""/>
  <input type="submit" value="Submit"/>
</form>
Update AccountController’s doAccount function with these parameters:
<?php
/*
* To change this template, choose Tools | Templates
* and open the template in the editor.
*/

/**
* Description of AccountController
*
* @author
*/
include_once APP_DIR . '/model/Template.php';
class AccountController extends Template{


  public function doAccount(){

    if(isset ($_POST['name'])){
     $this->name = $_POST['name'];
    }

    $template = APP_DIR . '/view/account/accountView';
    $this->invokeTemplate($template);
  }
}
?>
Save the changes and access the same url. What is the result? Place a value at the textbox and click submit. You must be able to see a greeting.There are better ways to do this however it is good to know the basic. The foundation of complexity lies on the base and it is good to understand how certain frameworks behave.
No comments:
Post a Comment